What you'll learn:
- How human eyes and cameras capture light — the shared pipeline
- Focal length — what determines field of view
- The exposure triangle — aperture, shutter speed, and ISO working together
- Sensor size — why it matters for FOV and depth of field
- Light meters — measuring scene brightness for correct exposure
Why Cameras?
Before we configure exposure in Unreal Engine, we need to understand how real cameras work. UE5's camera systems simulate physical cameras — sensor sizes, focal lengths, apertures, ISO. If you don't understand these concepts, the settings will feel like arbitrary numbers.
More importantly, understanding cameras helps you understand light itself. A camera is just a device for measuring and recording light. The same physics that governs a DSLR governs Unreal's virtual cameras.
We'll start with something you already have — your eyes.
Section 54: The Human Eye and Camera Pipelines (8 min)
Whether you're using your eyes or a camera, light follows a similar path — though cameras add a step that eyes don't have:
| Stage | Human Eye | Camera |
|---|---|---|
| 1 | Scene | Scene |
| ↓ | ||
| 2 | Cornea + Lens (focusing) | Lens (focusing) |
| ↓ | ||
| 3 | Pupil (aperture) | Aperture |
| ↓ | ||
| 4 | — | Shutter (timing) |
| ↓ | Eyes receive light continuously | |
| 5 | Retina (sensitivity) | Sensor/Film (sensitivity + recording) |
| ↓ | ||
| 6 | Optic Nerve (transmission) | ↓ |
| ↓ | ||
| 7 | Brain (processing) | Display/Film (final image) |
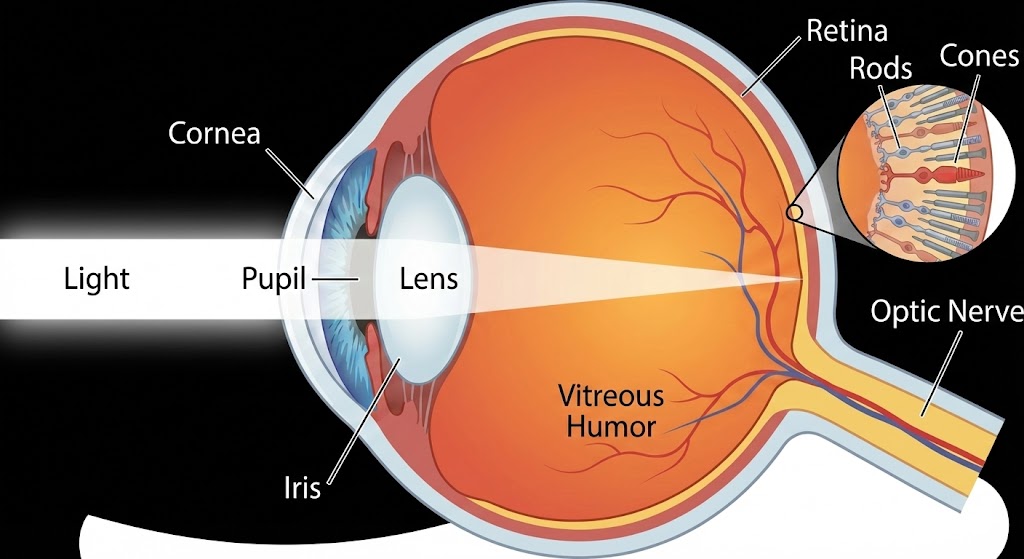 Human eye anatomy showing light path from cornea through lens to retina
| Component | Function |
|---|---|
| Cornea | Fixed outer lens — does most of the focusing |
| Pupil | Variable aperture — expands in dark, contracts in bright |
| Iris | Muscle that controls pupil size |
| Lens | Adjustable focus — changes shape for near/far |
| Retina | Light-sensitive surface — rods (brightness) and cones (color) |
| Optic Nerve | Sends signal to brain for processing |
Your eye automatically adjusts:
- Pupil size for brightness (like aperture)
- Lens shape for focus distance
- Sensitivity over time (dark adaptation)
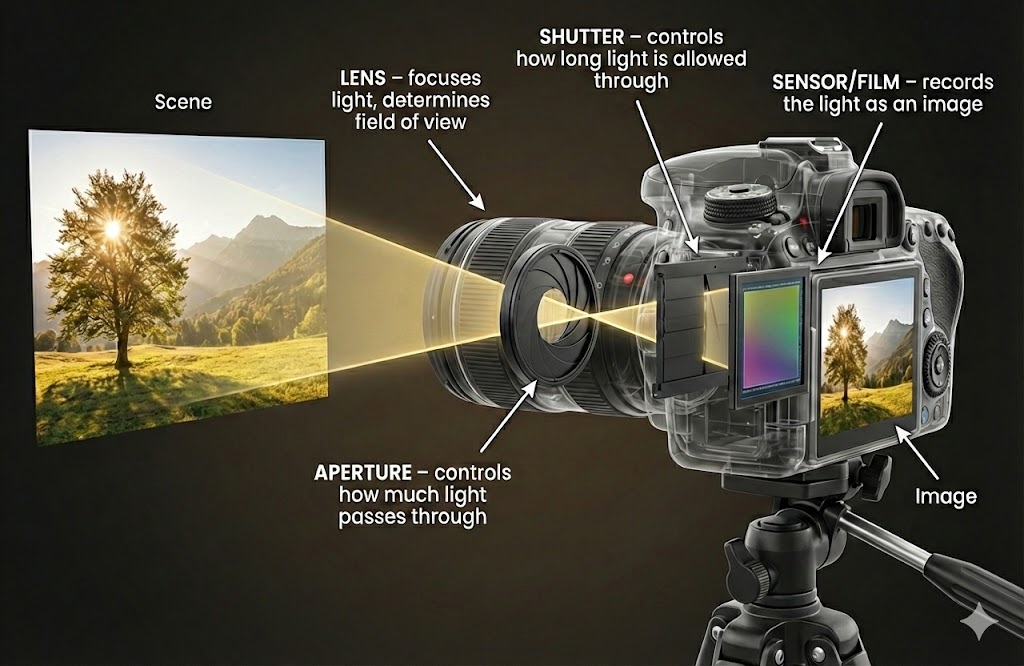 Camera anatomy showing light path from scene through lens, aperture, shutter to sensor
| Component | Function | Eye Equivalent |
|---|---|---|
| Lens | Focuses light, determines FOV | Cornea + Lens |
| Aperture | Controls light amount | Pupil (iris) |
| Shutter | Controls light duration | No equivalent — eyes receive light continuously |
| Sensor/Film | Sensitivity + recording | Retina (sensitivity) + Optic Nerve (signal transmission) |
| Display/Developed Film | Final viewable image | Brain (processing + perception) |
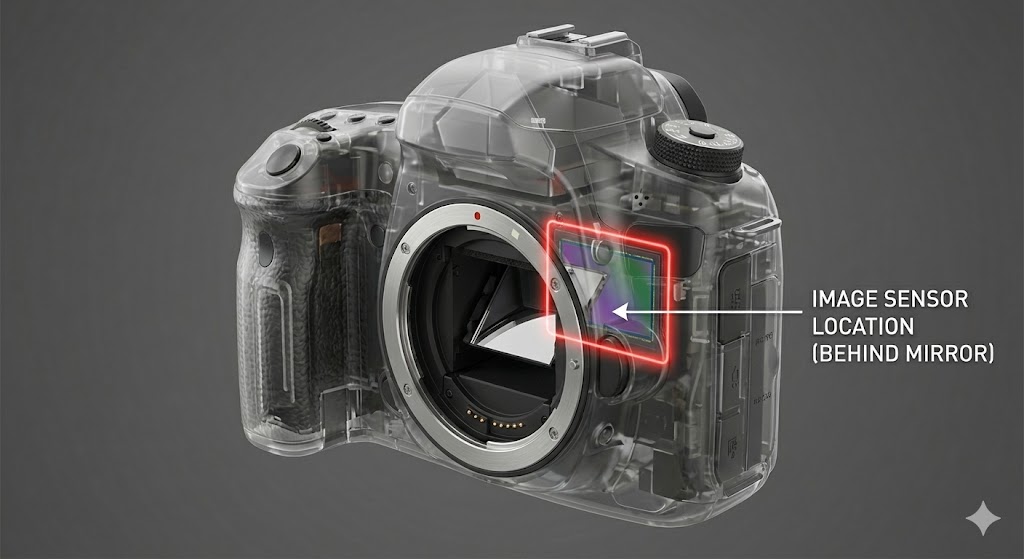 DSLR cutaway showing sensor behind the mirror
DSLR cameras have a mirror that reflects light to the viewfinder. The mirror flips up during exposure to let light hit the sensor.
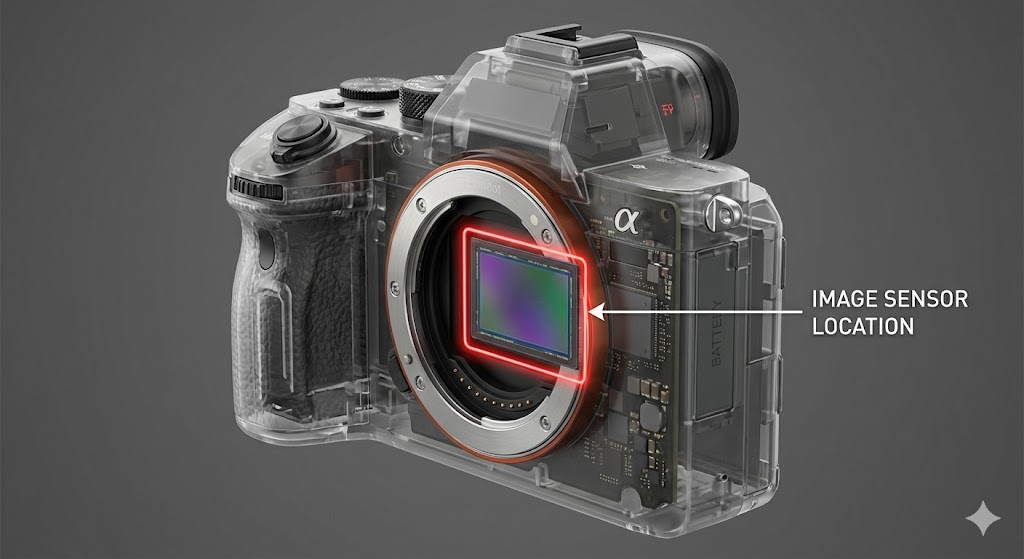 Mirrorless camera cutaway showing sensor location
Mirrorless cameras remove the mirror — light goes straight to the sensor. Simpler, lighter, but no optical viewfinder.
Your eye receives light continuously — there's no shutter. Your brain processes a constant stream of visual information.
A camera, by contrast, captures discrete moments. The shutter opens, light hits the sensor for a specific duration, then the shutter closes. This is why cameras need explicit control over exposure time — something your eye handles automatically through continuous adaptation.
Section 55: Focal Length (8 min)
Focal length is the distance from the lens's optical center to the sensor when focused at infinity. It determines field of view — how much of the scene the camera sees.
Focal length is measured in millimeters (mm) — the physical distance from the lens's optical center to the sensor plane:
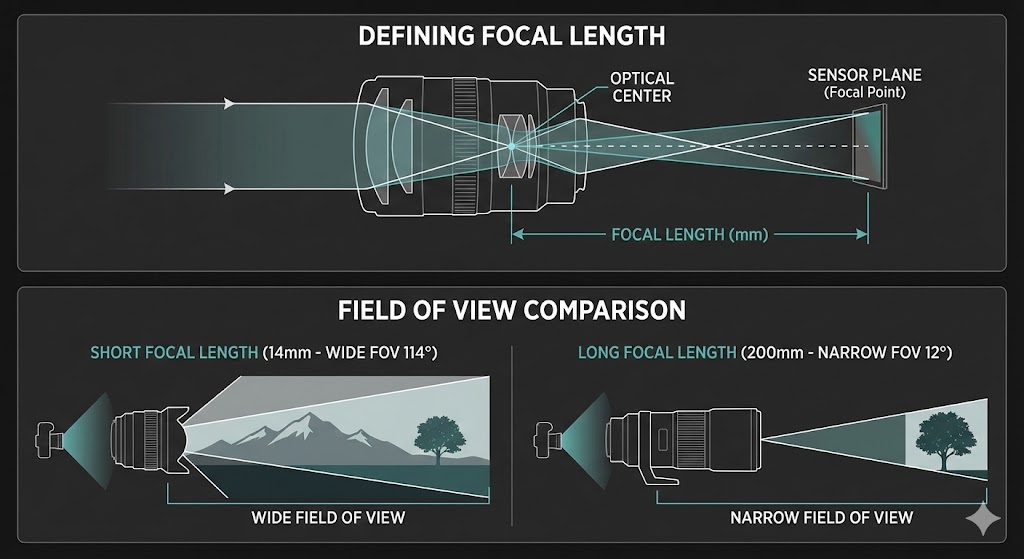 Focal length definition and FOV comparison
| Focal Length | Field of View | Common Use |
|---|---|---|
| 14-24mm | Very wide (84-114°) | Landscapes, architecture |
| 35mm | Wide (~63°) | Street, environmental |
| 50mm | Normal (~47°) | General purpose, "human eye" |
| 85mm | Narrow (~28°) | Portraits |
| 200mm+ | Very narrow (~12° or less) | Wildlife, sports |
Shorter focal length = wider field of view Longer focal length = narrower field of view (more "zoom")
| Type | Description | Characteristics |
|---|---|---|
| Prime | Fixed focal length | Sharper, faster (wider aperture), lighter. You "zoom with your feet." |
| Zoom | Variable focal length | Versatile, heavier. Rotate ring to change FOV. |
A 50mm prime lens is always 50mm. A 24-70mm zoom can be set anywhere in that range.
Focal length affects how objects appear relative to each other:
| Focal Length | Effect |
|---|---|
| Wide (14-35mm) | Exaggerates distance, stretches edges, can distort faces |
| Normal (50mm) | Close to human perception |
| Telephoto (85mm+) | Compresses distance, flatters faces, stacks background |
This is why portrait photographers use 85mm+ lenses — the compression is flattering. Wide lenses make noses look bigger and ears smaller.
Section 56: Exposure (5 min)
Exposure is the total amount of light that reaches the sensor or film. Too little light = dark image (underexposed). Too much light = bright, washed out image (overexposed).
Correct exposure produces an image where:
- Shadows have detail (not pure black)
- Highlights have detail (not pure white)
- Mid-tones look natural
Your eye handles exposure automatically:
- Pupils dilate in darkness (more light in)
- Pupils contract in brightness (less light in)
- Retina adapts sensitivity over minutes (dark adaptation)
You never think about it — your brain just handles it.
Cameras require manual or automatic control of three settings:
| Control | What It Does | Location |
|---|---|---|
| Aperture | How much light enters | Lens |
| Shutter Speed | How long light enters | Camera body |
| ISO | How much light is needed | Film/Sensor |
These three controls form the exposure triangle. They work together to achieve correct exposure:
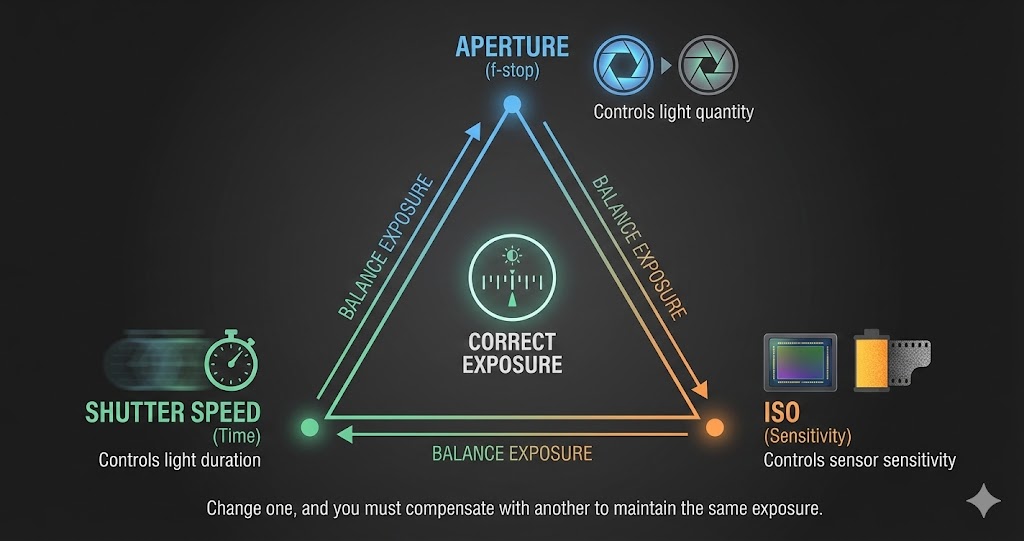 The exposure triangle - aperture, shutter speed, and ISO balance to create correct exposure
Change one, and you must compensate with another to maintain the same exposure. The next three sections explain each control in detail.
Section 57: The Aperture (10 min)
The aperture is an adjustable opening inside the lens that controls how much light passes through. Think of it like the pupil of your eye.
| State | Light | Analogy |
|---|---|---|
| Wide open | Maximum light | Pupil dilated in darkness |
| Stopped down | Minimum light | Pupil contracted in brightness |
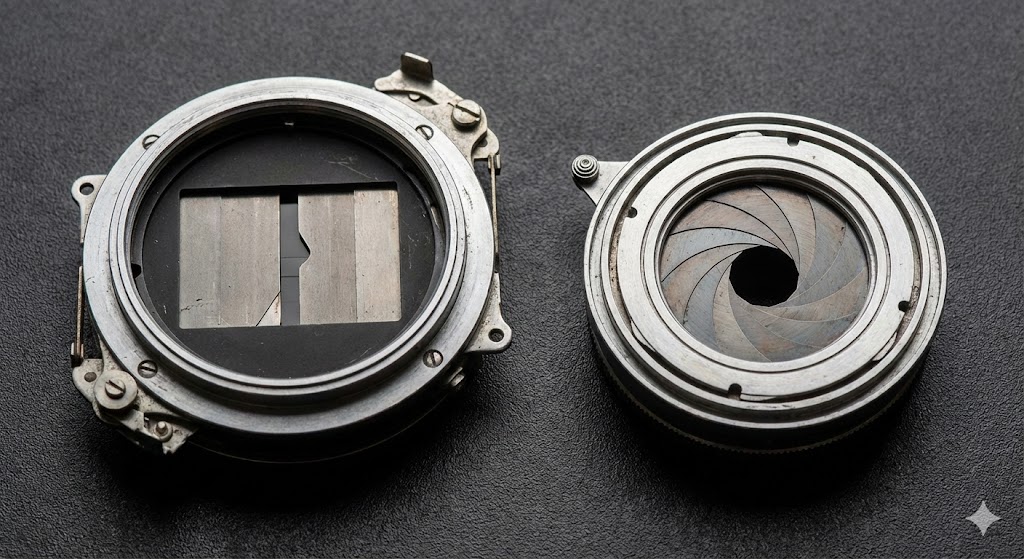
The aperture is made of overlapping blades that form a roughly circular opening. The number of blades affects the shape of out-of-focus highlights (bokeh).
Aperture is measured in f-stops. Counterintuitively, lower numbers = larger openings:
 Aperture blades at f/2.8, f/8, and f/16 showing decreasing opening size
| f-stop | Opening Size | Light |
|---|---|---|
| f/1.4 | Very large | Maximum |
| f/2.8 | Large | Lots |
| f/5.6 | Medium | Moderate |
| f/8 | Small | Less |
| f/16 | Very small | Minimum |
Why the confusing numbers? The f-stop is a ratio: focal length ÷ aperture diameter.
50mm lens at f/2 = 25mm opening (50 ÷ 2)
50mm lens at f/8 = 6.25mm opening (50 ÷ 8)
Each stop halves the light (or doubles it, going the other way):
f/1.4 → f/2 → f/2.8 → f/4 → f/5.6 → f/8 → f/11 → f/16 → f/22
      ←—————————————— less light ——————————————→
| Type | Description | Example |
|---|---|---|
| Constant | Same max aperture throughout zoom range | 24-70mm f/2.8 |
| Variable | Max aperture changes with zoom | 18-55mm f/3.5-5.6 |
Variable aperture lenses are cheaper but more complex to use — zooming in reduces your maximum aperture.
Aperture controls depth of field (DOF) — how much of the scene is in acceptable focus.
| Aperture | DOF | Look |
|---|---|---|
| f/1.4 - f/2.8 | Very shallow | Blurry background, subject isolation |
| f/4 - f/5.6 | Moderate | Some background blur |
| f/8 - f/11 | Deep | Most things sharp |
| f/16 - f/22 | Very deep | Nearly everything in focus |
Wide aperture = shallow DOF = creamy background blur (bokeh) Narrow aperture = deep DOF = everything sharp
Section 58: The Shutter (8 min)
The shutter is a mechanical curtain or blade that controls how long light hits the sensor. It's like blinking — open, let light in, close.
 Focal plane shutter (left) and leaf shutter (right)
| State | Duration | Light |
|---|---|---|
| Open longer | More time | More light |
| Open shorter | Less time | Less light |
Shutter speed is expressed as fractions of a second:
| Speed | Duration | Description |
|---|---|---|
| 1/1000s | 0.001 sec | Very fast — freezes motion |
| 1/250s | 0.004 sec | Fast — general action |
| 1/60s | 0.017 sec | Moderate — handheld minimum |
| 1/30s | 0.033 sec | Slow — tripod recommended |
| 1s | 1 second | Very slow — tripod required |
| 30s | 30 seconds | Long exposure — star trails, light painting |
Each stop doubles the light (or halves it):
1/1000 → 1/500 → 1/250 → 1/125 → 1/60 → 1/30 → 1/15 → 1/8
       ←————————————— more light ———————————————→
Shutter speed controls motion blur — how moving subjects appear.
| Shutter Speed | Motion Blur | Best For |
|---|---|---|
| 1/1000s+ | None — frozen | Sports, birds, fast action |
| 1/250 - 1/500s | Minimal | People walking, general |
| 1/60 - 1/125s | Slight on fast subjects | Stationary subjects |
| 1/30s or slower | Significant | Intentional blur, waterfalls, night |
Fast shutter = frozen motion = less light Slow shutter = motion blur = more light
Section 59: The ISO (10 min)
ISO measures how much light the sensor or film needs to create a properly exposed image.
| ISO | Light Needed | Description |
|---|---|---|
| Low (100) | Lots of light | "Slow" — sensor/film fills slowly |
| High (3200) | Little light | "Fast" — sensor/film fills quickly |
You may hear ISO called film speed:
- Slow film (ISO 100) = needs lots of light
- Fast film (ISO 800+) = needs less light
Think of it like filling a bucket:
- Low ISO = big bucket, takes more water (light) to fill
- High ISO = small bucket, fills quickly with less water
| Aspect | Film | Digital |
|---|---|---|
| What determines ISO | Crystal size (physical) | Amplification (electronic) |
| Can change per frame | No — fixed per roll | Yes — any time |
| "Changing ISO" | Buy different film | Adjust setting |
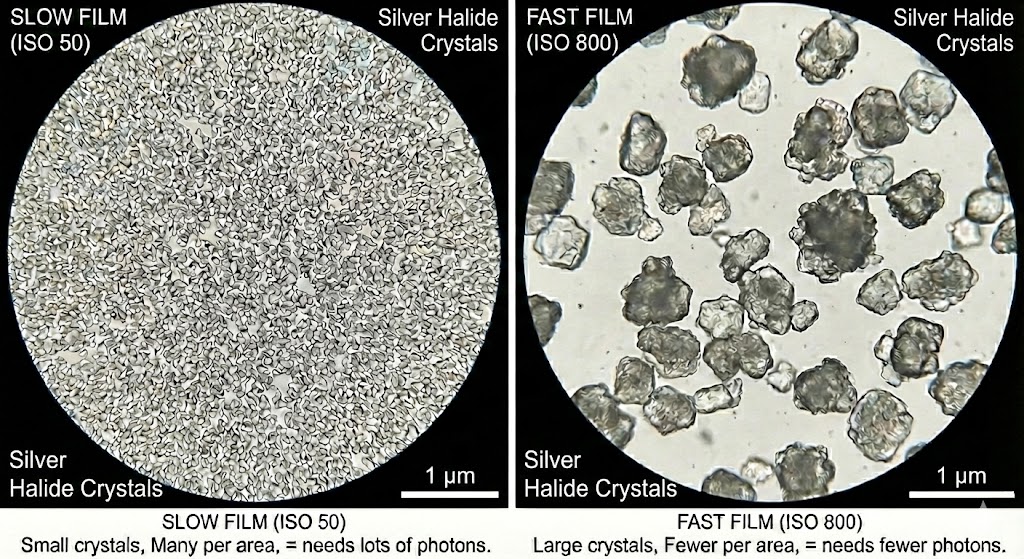 Silver halide crystal comparison
Film: Larger silver halide crystals = more sensitive = higher ISO. You're committed for the whole roll.
Digital: The sensor has fixed sensitivity. "Raising ISO" amplifies the electrical signal — like turning up the volume on a quiet recording.
Higher ISO comes with a cost:
| ISO | Film Effect | Digital Effect |
|---|---|---|
| Low (100-200) | Fine grain, sharp | Clean, detailed |
| Medium (400-800) | Visible grain | Some noise |
| High (1600+) | Heavy grain | Significant noise |
Film grain comes from larger crystals being visible. Digital noise comes from amplifying the signal — you amplify the noise floor too.
ISO 100: Photons → Electrons → 1× amplification → Clean signal
ISO 800: Photons → Electrons → 8× amplification → Signal + 8× noise
This is why shadows are noisier than highlights — shadows have weaker signal, so the noise is more visible relative to it.
Section 60: Sensor Size (8 min)
Sensor size is the physical dimensions of the light-capturing surface, measured in millimeters.
In film cameras, this was the film format. In digital cameras, it's the sensor dimensions. Same concept, different technology.
| Format | Size (mm) | Common Use |
|---|---|---|
| Smartphone | ~5 × 4 to 10 × 7 | Phone cameras |
| Micro 4/3 | 17 × 13 | Mirrorless (Panasonic, Olympus) |
| APS-C | ~22 × 15 | Consumer DSLR/mirrorless |
| Full Frame / 35mm | 36 × 24 | Professional DSLR/mirrorless |
| Polaroid Go | 47 × 46 | Instant film |
| Medium Format | 60 × 45+ | High-end professional |
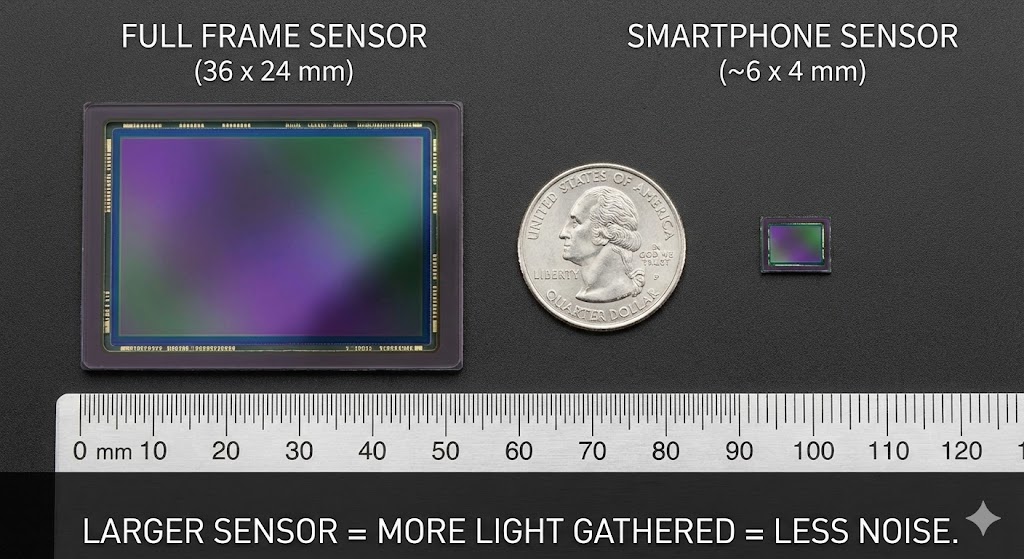 Full frame vs smartphone sensor size comparison
1. Affects FOV (with focal length)
Same lens, different sensor = different field of view:
50mm on Full Frame: 47° FOV
50mm on APS-C: 32° FOV (1.5× crop)
50mm on Micro 4/3: 25° FOV (2× crop)
2. Affects DOF characteristics
Larger sensors allow shallower depth of field at the same field of view:
Full Frame @ 50mm f/2.0 (47° FOV):
  → Shallow DOF, creamy background blur

Phone @ 6.9mm f/1.68 (same 47° FOV):
  → Deep DOF, almost everything in focus
This is why phone "portrait mode" uses software blur — the tiny sensor physically cannot produce shallow DOF.
3. Affects noise performance
Larger sensors collect more light per pixel = less noise in low light.
Crop factor describes how a sensor "crops" the image compared to full frame:
| Sensor | Crop Factor | 50mm Equivalent |
|---|---|---|
| Full Frame | 1.0× | 50mm |
| APS-C (Canon) | 1.6× | 80mm equivalent FOV |
| APS-C (Nikon/Sony) | 1.5× | 75mm equivalent FOV |
| Micro 4/3 | 2.0× | 100mm equivalent FOV |
"Equivalent" means same field of view, NOT same depth of field or compression.
Section 61: Revisiting the Exposure Triangle (10 min)
Now that you understand each control individually, let's see how they work together:
| Control | What It Controls | Location | Side Effect |
|---|---|---|---|
| Aperture | How much light | Lens | Depth of field |
| Shutter Speed | How long light enters | Body | Motion blur |
| ISO | How much light is needed | Film/Sensor | Noise/grain |
The goal is correct exposure — not too bright, not too dark.
Each control adds or removes light in stops:
- 1 stop = doubling or halving light
- +1 stop = 2× brighter
- -1 stop = 0.5× brighter (half)
Change one control → compensate with another → same exposure.
Starting point: f/8, 1/125s, ISO 100 (correctly exposed)

Want shallower DOF? Open aperture to f/4 (+2 stops light)
Compensate: Speed up shutter to 1/500s (-2 stops light)
Result: Same exposure, shallower DOF
All of these produce identical brightness:
| Aperture | Shutter | ISO | Notes |
|---|---|---|---|
| f/16 | 1/125s | 100 | Baseline |
| f/11 | 1/250s | 100 | +1 aperture, -1 shutter |
| f/8 | 1/500s | 100 | +2 aperture, -2 shutter |
| f/16 | 1/250s | 200 | -1 shutter, +1 ISO |
| f/8 | 1/125s | 50 | +2 aperture, -1 ISO |
Same brightness, but each combination produces different side effects.
| Setting Choice | Side Effect |
|---|---|
| Wide aperture (f/2) | Shallow DOF (blurry background) |
| Narrow aperture (f/16) | Deep DOF (everything sharp) |
| Slow shutter (1/30s) | Motion blur |
| Fast shutter (1/1000s) | Frozen motion |
| High ISO (3200) | Noisy/grainy |
| Low ISO (100) | Clean image |
Need shallow DOF (blurry background)?
  → Adjust APERTURE first (open wider)

Need frozen motion?
  → Adjust SHUTTER first (faster)

Aperture and shutter locked for creative reasons?
  → Adjust ISO

Low light and can't change aperture/shutter?
  → Raise ISO (accept the noise)
Sunny outdoor portrait:
Lots of light available
Want blurry background → Wide aperture (f/2.8)
Compensate → Fast shutter (1/2000s)
Keep clean → Low ISO (100)
Indoor sports/kids:
Limited light
Need frozen motion → Fast shutter (1/500s)
Open up → Wide aperture (f/2.8)
Still not enough light → Raise ISO (800-1600)
Accept some noise
Waterfall long exposure:
Want motion blur → Slow shutter (1/4s)
Too much light → Narrow aperture (f/16)
Keep clean → Low ISO (100)
Still too bright? → Need ND filter (blocks light)
Think of exposure as a budget:
- You have a "correct exposure" amount to hit
- Three ways to get there
- Each way has a cost (side effect)
- You choose which costs you're willing to pay
Section 62: Light Meters (8 min)
A light meter measures scene brightness and tells you what exposure settings to use. It's how you know if a scene is bright or dark before taking a photo.
Light meters typically report values in:
- EV (Exposure Value) — a standardized brightness scale
- Lux — absolute light measurement
| Type | How It Works | Use Case |
|---|---|---|
| Incident | Measures light falling ON the subject | Handheld meter pointed at camera from subject position |
| Reflected | Measures light bouncing OFF the subject | What cameras see; what built-in meters use |
Incident metering is more accurate but requires a separate handheld meter. Reflected metering is what every camera uses internally.
Every camera has a built-in light meter that reads reflected light from the scene. It suggests exposure settings based on the assumption that the scene averages to 18% grey (middle brightness).
This works most of the time. It fails when:
- Scene is mostly white (camera underexposes)
- Scene is mostly black (camera overexposes)
- Strong backlight (camera exposes for background)
EV100 (Exposure Value at ISO 100) gives you a standardized brightness scale:
| Condition | EV100 |
|---|---|
| Bright sun on snow | 16 |
| Bright sunny day | 15 |
| Hazy sun | 14 |
| Cloudy bright | 13 |
| Overcast | 12 |
| Open shade | 10 |
| Well-lit interior | 7-8 |
| Dim interior | 5-6 |
| Candlelight | 1-2 |
UE5 provides tools to measure scene brightness:
Visualize > EV100
- Shows exposure values across the scene
- Helps verify lighting is in correct range
Visualize > Luminance
- Shows absolute brightness in nits (cd/m²)
- Useful for HDR workflows
Pixel Inspector
- Read exact values at a specific pixel
- Window > Developer Tools > Pixel Inspector
Light meters help you:
- Verify lighting is in correct range — Is your sunny outdoor scene actually EV 15?
- Match real-world reference values — Ensure consistency with physical cameras
- Debug exposure issues — Is the scene too bright/dark, or is the camera misconfigured?
A classic photographer's shortcut:
On a sunny day (EV 15), use f/16 and shutter speed = 1/ISO.
| ISO | Sunny Day Settings |
|---|---|
| 100 | f/16, 1/100s |
| 200 | f/16, 1/200s |
| 400 | f/16, 1/400s |
This gives you a baseline without a light meter. Adjust from there for different conditions.
Key Points:
- Human eyes and cameras follow the same light pipeline — focusing, aperture, recording
- Focal length determines field of view; sensor size affects the crop
- Aperture controls light amount and depth of field (lower f-stop = more light, shallower DOF)
- Shutter speed controls light duration and motion blur (slower = more light, more blur)
- ISO controls sensitivity/gain (higher = needs less light, but more noise)
- Sensor size affects FOV, DOF potential, and noise performance
- The exposure triangle is a balancing act — change one, compensate with another
- Light meters measure scene brightness in EV — use them to verify your lighting
Now that you understand how cameras work, in Part 16: Calibration we'll learn how to verify correct exposure using reference materials and configure UE5's exposure systems.